Recipe time! For a fun music filled night with friends last weekend, I decided to do some baking again. I love to bake, but don’t get to do it enough. Time is an issue, but since I usually have to eat everything by myself, it isn’t a great idea as well. So that’s why my baking endeavors are now limited to whenever I have time and there is a social gathering. Case in point: last Saturday and I made a raspberry ripple cheesecake.

Raspberry ripple cheesecake
My inspiration for this cheesecake was fairly simple: cheesecake is always good and it’s a recipe I know how to make. I then added on some fruit goo, which is often used by Cupcake Jemma on Youtube to decorate her cupcakes. I decided to use it to decorate my cheesecake and change it up a bit. And with Christmas just around the corner, I couldn’t think of a better moment to post this recipe. Here’s how I did it!

Total time: 15 hours. Prep time: 1.5 hours + getting cream cheese to room temperature. Cooking time: 1 hour. Resting time: one night + 6 – 8 hours. Serves: 8.
Cheesecake is not a fast process. It mainly requires patience and lots and lots of waiting. I make my cheesecakes the night before. I started off in the morning by putting the butter and cream cheese on my kitchen counter top. During the day, they could then get to room temperature which will give you a much smoother texture. Once baked, I like to let my cake rest a full night in the oven with the door slightly ajar. This allows the cheesecake to set completely and less likely to break apart.
Part 1: Fruit goo

Ingredients:
- 55 grams of caster sugar
- 200 grams of frozen raspberries

I started off by making the fruit goo. This is super simple, yet should be done first or in advance to allow time to cool. You simply put the sugar and the fruit into a pan and on a medium heat your bring the mixture to a simmer. Lower the heat and leave on for 10 – 15 minutes or until your mixture becomes slightly thick. When still warm, pour into a sieve and press the goo through the sieve with a spoon. Set aside.
Part 2: The base

Ingredients:
- 250 grams Bastogne cookies (regular digestives also work, but I prefer the taste of these)
- 70 grams of melted butter + extra

With your extra lump of butter, apply a generous layer all over your spring form. I added a sheet of baking paper on the bottom just for good measure. Preheat your oven to 160 Celsius.

In a food processor, chop up the cookies until they have turned into crumbs. Melt the butter and stir through the cookies. Now dump into the spring form and use the back of a spoon to spread out the mixture and press it firmly down.
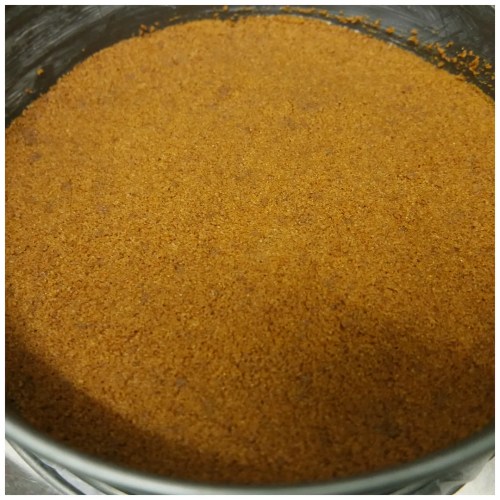
Bake at 160 Celsius for 8 minutes. Let cool.
Part 3: Cheesecake

Ingredients:
- 900 grams of cream cheese (at room temperature)
- zest of 2 oranges
- 4 eggs
- 1 cup or 200 grams of white sugar
- 1 teaspoon vanilla extract
- 3 tablespoons of selfraising flour
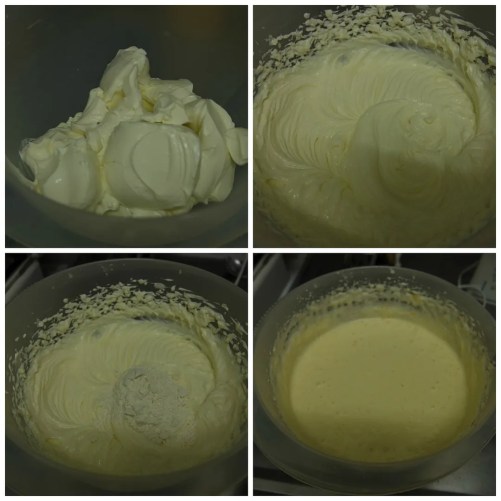
Increase oven temperature to 175 Celsius. In a bowl and using a hand mixer, beat the cream cheese and the sugar until light and fluffy. Add in 3 table spoons of selfraising flour and mix well. Add eggs 1 at the time. Beat well after each egg has been added.

Mix in orange zest and vanilla. Pour onto crust which should now be nice and cool. Add random blobs of fruit goo onto your cheesecake. Take a knife and gently start drawing a random pattern to ripple the fruit goo throughout the cake. Be careful not to put the knife in to deep as it can damage the crust underneath. Add more until you get the desired effect.

Bake at 175 Celsius for one hour. Leave in the oven overnight, with the door cracked open a touch (or long enough for the cheesecake to cool down completely and settle). I like covering the door with a towel once the oven has cooled down to prevent anything nasty happening to it. Put into the fridge and chill for at least 6 – 8 hours. This last step will make the cheesecake more dense in texture and ensure all the flavors come together.
Part 4: The finishing touch

Sprinkle with icing sugar if you so desire. I also used the remaining raspberry goo to draw a random pattern onto the cake. If you have a piping bag (which I didn’t) you can use it to lightly drizzle the cake with the goo instead. I added a fresh raspberry on top for a final touch.

Ta-dah! One slice of raspberry ripple cheesecake. Time consuming? Yes. Well worth the time and effort? Yes! The flavors were balanced perfectly in this one. The orange and raspberry go together very nicely and it isn’t too sweet. The zestiness of the orange with the tanginess of the raspberry were just a match made in heaven. The base is crunchy and because I used a brown sugar based cookie it added a nice almost nutty flavor to the cake.
Would you try making this?
Raspberry ripple cheesecake not your thing? See these blog posts for more cheesecake recipes:


Leave a Reply